Saturday, April 29, 2023

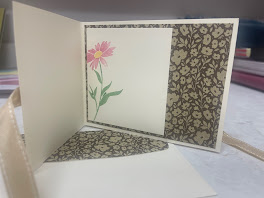
FUN FOLD HELLO

 FUN FOLD HELLO


HOW TO ASSEMBLE: 

  1. Fold your card base (4 1/4" x 9 1/4" scored at 3 3/4") on the score line and burnish.
  2. Stamp flower in Cherry Cobbler on a scrap of vanilla cardstock.  Die cut out. Set aside.
  3. Die cut stem out of Spruce cardstock. Set aside.
  4. On smaller square of Vanilla (3" x 3 1/2") cardstock, stamp the butterflies in Espresso ink towards top left side. De-stress with dauber. 
  5. Adhere flower and stem.  (I used mini diensional to give the flower a little "pop".) Set aside.
  6. Stamp sentiment on scrap of cardstock and punch out.  Adhere it with dimensionals.
  7. Adhere the piece of espresso (3 1/4" x 3 3/4") cardstock to the piece of Cobbler (3 1/2" x 4") cardstock.  
  8. Adhere this to the card front.
  9. Adhere the DSP (5 1/4" x 4") to the inside of your card.  
  10. On the larger square of Vanilla (3 3/8" x3 3/4") cardstock stamp a flower on the left edge. Adhere this to the inside left of your card. De stress the edges.
  11. Fold your card closed then take your piece of ribbon bring it around the middle of the card and tie a soft knot to the right of the flap. Once it’s in the position you want it in, adhere the piece from step 3 over it on card front. Using Tear & Tape adhesive, adhere the ribbon to the back of the card and tie.
  12. (Optional) Adhere the additional piece of DSP (5 3/4" x 2 1/4")to the flap of your envelope and trim. 
WHAT YOU'LL NEED:

Wednesday, April 26, 2023

 FOR A SPECIAL PERSON ON A SPECIAL DAY


HOW TO ASSEMBLE: 

  1. Take the piece of white cardstock and run it through the die cut machine using the frame with hearts. Adhere this to the piece of Polished ink cardstock. 
  2. Run the Mossy Meadow cardstock through the die cutting machine using the smaller textured frame.  Adhere it to the white cardstock inside the heart frame.
  3. Stamp the sentiment in Balmy Blu inside this frame.
  4. Adhere this to the card front using Foam Adhesive Strips.
  5. Stamp sentiment inside. Set card aside.
  6. On scraps of white cardstock, stamp the flowers, color, run through die cut machine. Adhere to the card front using dimensionals. Embellish with a touch of Wink of Stella and some gems.
  7. Stamp envelope flap with floral arrangement, color and touch with Wink of Stella. 

WHAT YOU’LL NEED:

Monday, April 24, 2023

Simply Fabulous Thank You

 SIMPLY FABULOUS THANK YOU

CASED: Julie Davison


HOW TO ASSEMBLE: 

  1. Stamp sentiment and three flower on a scrap of white cardstock in the ink color of your choice. Die cut out the sentiment and fussy cut out the flowers. Set aside.
  2. On the small square of white cardstock (3 1/4" x 3 1/4") stamp the wreath by stamping first on each side if the square. Then come in and fill in on the corners between the stems already stamped. Adhere this piece to the square piece of Parakeet cardstock (3 1/2" x 3 1/2").
  3. On the larger rectangular piece of white cardstock (5 1/4" x 4"), stamp the inside sentiment and a flower or two.  Adhere this to the inside of the card.
  4. On the card front, adhere the narrower of the two strips of DSP (5 1/2" x 2") centered. 
  5. Adhere the thin daffodil strip of cardstock (5 1/2" x 1/2") down the middle of the piece you just adhered.
  6. Centered above this, using dimensionals, adhere the square piece from step 1. 
  7. Adhere the sentiment with dimensionals. Arrange the flowers however you would like on your wreath.  Adhere the jewels in the center of the flowers.
  8. Tie a bow in the twine and using a mini glue dot, adhere it to the wreath.  
  9. (Optional) Adhere the wider of the two pieces of DSP (2 1/4" x 5 3/4") to the flap of you envelope.  Trim.
WHAT YOU'LL NEED:

You're the Best Part of My Day

  YOU’RE THE BEST PART OF MY DAY HOW TO CREATE & ASSEMBLE: Fold and burnish card base. Set aside. Run (3 1/4” x 5 1/4”) piece of Crumb C...