Wednesday, March 29, 2023

LONG TIME, NO TACO

 I thought this stamp set was so cute and a great leap from all the floral stamp sets. Have fun with it..  

LONG TIME, NO TACO

HOW TO CREATE/ASSEMBLE:

  1. Run the (5 1/2” x  4 1/4”) piece of Crumb Cake cardstock through the emboss machine in the Textured 3D Folder.  Then, run it back through with the large stitched rectangle die. Set aside.
  2. Run your red cardstock through the die cut machine with the two different sized squares and the larger banner. Set aside.
  3. Run the green cardstock through the die cut machine with the two sized squares and the smaller banner. Stamp the sentiment on the green banner in black.. Adhere it to the red banner. Set aside.
  4. On your white scraps of cardstock, stamp the taco, burrito, chili pepper, saguaro, and sombrero.  Color using the Stampin’ Blends. Fussy cut with your snips.
  5. Adhere these to the stitched squares and then arrange these (and the sentiment banner) on the embossed piece of crumb cake cardstock.
  6. Adhere this to your card front using dimensional.
  7. Optional: Stamp whatever you would like on your envelope to coordinate with your card. Don’t forget to color it in being careful to not let the ink bleed through the the other side of the envelope.

WHAT YOU’LL NEED:

Wednesday, March 22, 2023

AWASH IN BEAUTY EASTER


I didn't have any Easter stamps so I knew the Awash in Beauty Designer Paper would be beautiful and then I used the Alphabet dies.  Kept it simple and a beautiful Christian sentiment inside.

                          AWASH IN BEAUTY EASTER


HOW TO CREATE/ASSEMBLE:

  1. Adhere the DSP to the piece of Pink cardstock Set aside.
  2. Stamp the sentiment on the inside in Balmy Blue.
  3. Run the Balmy Blue cardstock through the Stampin’ Cut & Emboss Machine® to die cut the letters EASTER. Adhere the letters to the top of the DSP.
  4. Wrap the seam binding around the card front-end adhere the bow. Adhere this to the card front.
  5. Optional:vAdhere strip of DSP with multipurpose liquid glue to the envelope flap and trim around to fit.

WHAT YOU’LL NEED:

Wednesday, March 15, 2023

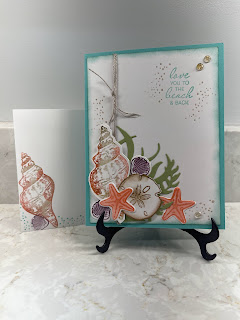
LOVE YOU TO THE BEACH & BACK!

 LOVE YOU TO THE BEACH & BACK!

HOW TO CREATE/ASSEMBLE:

  1. Take the stamp with the larger Conch shell and ink it with the Crumb Cake ink then use a dauber to add in a bit of the Calypso Coral or Coastal Cabana and stamp on white cardstock, then die cut it out.  Set aside. (Optional) Stamp the envelope in the same way if you would like it to coordinate.
  2. Stamp the sand dollar, starfish, shells on white cardstock (whichever shapes you want and in the colors you want.) Then die cut them out. Set them all aside.
  3. Using the piece of Pear (or whatever scrap of cardstock you have mourned) and die cut some greenery. 
  4. Take the 5 1/4" x 4" piece of white cardstock and "de-stress" the edges using the dauber and the Coastal Cabana ink around the edges. Stamp the sentiment in the upper right hand corner. 
  5. Take the linen thread and wrap it around the piece of white cardstock twice on the left side and tie a knot towards the top.
  6. Arrange your shells in the lower left corner of the white cardstock using dimensionals on some.  Stamp a couple of bubbles  and add a few rhinestone gems. Once this “scene” is created, adhere this to the card front..
  7. Feel free to stamp a shell or two to the inside of your card.

WHAT YOU’LL NEED: 

You're the Best Part of My Day

  YOU’RE THE BEST PART OF MY DAY HOW TO CREATE & ASSEMBLE: Fold and burnish card base. Set aside. Run (3 1/4” x 5 1/4”) piece of Crumb C...