Wednesday, June 28, 2023

Patchwork Pieces Celebrate the 4th of July

I don't know about you all however I feel blessed to live in this country.  The United States of America is most definitely THE best place to live.  So why not celebrate it? CELEBRATE  4TH OF JULY

HOW TO MAKE AND ASSEMBLE:

  1. Run a white, a red, and navy piece of cardstock through the the Die cut machine each with the patchwork die. (I have done this for you)
  2. Recreate the patchwork alternating red, white, and blue and adhere on the 3-1/2” x 5” piece of Crumb Cake card stock. Set aside.
  3. Run a scrap of each red, white, and blue cardstock through the die machine with the scoop of ice cream die. Set aside.
  4. Run the small piece of Crumb Cake cardstock through machine with the ice cream cone die. Fold it to form the cone and create your cone on the front of your card.  Don’t forget to add a cherry o top.
  5. Run the scrap of white cardstock through die machine with the banner die.  Stamp the sentiment. 
  6. Take the piece of Linen thread, wrap it around your fingers a couple of times then bunching it in the middle and adhere down with a mini stampin’ glue dot. 
  7. Using dimensional, adhere the sentiment over the linen thread.
  8. For the inside, adhere a strip of red and a strip of blue cardstock on the left side of the 5-1/4” x 4” white piece of cardstock.  Run it through the die machine with the stitched Rectangle die.  Adhere to the inside of the card.

WHAT YOU’LL NEED:

Wednesday, June 21, 2023

Earthen Textures Thank You


So are any of you fans of earth tones?  I'm loving moody mauve with pebbled path and copper clay.  Loving the Earthen Textures Bundle also.  Did you know that you can get this bundle with the sentiments n Spanish?

EARTHEN TEXTURES THANK YOU 

HOW TO MAKE AND ASSEMBLE::

  1. Let’s start this one with all of our stamping.  
  2. On the small piece of Copper Clay Cardstock, stamp the palm fronds in Copper Clay.
  3. On the small piece of Pretty Peacock cardstock, stamp thank you sentiment in. Pretty Peacock.
  4. On the larger (5-1/4” x 4”) piece of Gray Granite Cardstock stamp the inside image.  Vase (in copper clay), plant and sentiment (in pretty peacock). Adhere to the inside of your card. (Optional: While you are doing this, you may want to stamp the same on the front of your envelope so that it will coordinate with your card. )
  5. Now we are going to run everything through the die cut machine.
    1. Taking the smaller piece of gray granite die cut with deckled rectangle.
    2. Die cut palm fronds.
    3. Die cut 2-3 palm fronds in different coordinating colors of cardstock.
    4. Die cut around the thank you sentiment with small deckled rectangle.
    5. Using your DSP die cut out two different size vases.
  6. Take two small pieces of the wavy trim and wrap around the two vases.  I found easiest to run some stampin seal® on the back then when I wrapped the ends of the trim to the back it stuck to the stampin seal®
  7. Using either glue, stampin’ seal®, or even mini stampin’ glue dot adhere the leaves to the piece of deckled gray Granite.
  8. Adhere the vases over the stems of your leaves with stampin’ Dimensionals.
  9. Adhere this to you card front lower left.
  10. Using dimensional, adhere the sentiment top right corner.
  11. I not only stamped the front of my envelope but I also adhered coordinating cardstock to the flap of the envelope and trimmed it out.

WHAT YOU’LL NEED:

Thursday, June 15, 2023

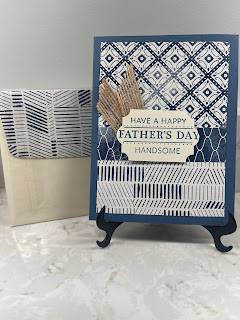
HAPPY FATHER'S DAY

 For those of you who no longer have a father to send a Father's Day card to but who have a husband, the father of your children, here's a card for you.

Who said you cant use retired products?? I say GO FOR IT!

If you haven't had the opportunity to purchase any of the current stamp sets with Father's Day sentiments, do as I did and dig through your retired products.  Most of the products used on this card are retired except the the Very Vanilla cardstock and envelope, and the Misty Moonlight cardstock and ink.  I pulled out the Handsomely Suited Stamp set, the Every Day label Punch, Burlap ribbon, and designer series paper all of which are retired.   I do have some of these items available for sale if you are interested. 

HAPPY FATHER'S DAY HUSBAND


  1. I started with the Misty Moonlight cardstock cut to the standard 8-1/2" x 5-1/2" and scored at 4-1/4" for the card base.
  2. then cut three pieces of coordinating Designer Series paper. (2-3/4" x 3-3/4, 2-1/4" x 3-3/4", and 1" x 3-3/4").  Adhere them centered on your card front. place the two larger pieces touching and then the 1" piece as a strip across where the other two meet.
  3. Stamp the sentiment on  piece of Very Vanilla cardstock then punch out with the Everyday Label punch. 
  4. Take a 5" piece of the burlap ribbon, fold it in half and adhere to the card.
  5. Slightly overlapping your folded ribbon using dimensionals, adhere the sentiment.
  6. For the inside I adhered a piece of Vanilla cardstock (5-1/4" x 4")
  7. To make the envelope coordinate, I adhered matching Designer Series Paper to the flap and trimmed it out.
That's all there is to it.  Enjoy Father's Day this weekend.


Wednesday, June 7, 2023

Hope You're Feeling Better


HOPE YOU’RE FEELING BETTER 

GATE-FOLD

Cased Peggy Noe 


HOW TO CREATE/ASSEMBLE: 

  1. Stamp the 4-1/8” x 5-3/8” piece of Lemon Lolly Cardstock all over then adhere to the 5-1/2” x 4-1/4” pieces Lemon Lime Twist Cardstock. * You could hold off on adhering if you would prefer to adhere the ribbon between the Lemon Lolly and Lemon Lime Twist cardstock.
  2. The next layer is an 11 x 4 piece of Poppy Parade cardstock scored at 2”, 3-3/4, 7-1/4”, and 9”. This leaves a center of 3-1/2.” Burnish the folds on the score lines.
  3. Adhere the back of this “card” to the center of the stamped layer with Multipurpose Glue. (Approx. 1” from each side.)
  4. For the center of the “card,” use a 3-3/4x 3-1/4 piece of Basic White cardstock. Stamp if you would like and adhere to the inside of the card.
  5. Take the two 1-3/4” x 3-3/4” pieces of Lemon Lolly Cardstock and run through the embossing machine in the embossing folder. (Optional: I ran the flap of my envelope through in the same embossing folder.)
  6. On the outside of the two front panels is first, adhere the 1-7/8x 3-7/8 piece of Lemon Lime Twist cardstock, and then the pieces of Lemon Lolly cardstock that were embossed. 
  7. Run your extra piece of Poppy crds stock through the die cut machine with 3-4 flowers and the contoured frame. And die cut some leaves on scraps of the Lemon Lime Twist cardstock. Set aside.
  8. Run the smaller piece of white cardstock through the die machine with the corresponding contour frame die. Stamp the sentiment centered.  (Not like I did.  Oops) Adhere on to the poppy die cut frame.
  9. Arrange and adhere your die cut flowers/leaves, using gems to embellish.
  10. Center your ribbon (@22”) around the card to tie on the right side. Then, using Tear & Tape Adhesive adhere the ribbon along the back of the framed sentiment.
  11. Using Multipurpose glue,  adhere the sentiment to the left side panel.
  12. Tie the card closed.
WHAT YOU'LL NEED:
You're the Best Part of My Day

  YOU’RE THE BEST PART OF MY DAY HOW TO CREATE & ASSEMBLE: Fold and burnish card base. Set aside. Run (3 1/4” x 5 1/4”) piece of Crumb C...