Wednesday, October 26, 2022

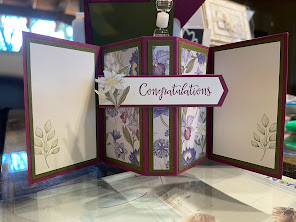
FUN FOLD CONGRATULATIONS

 FUN FOLD CONGRATULATIONS

Cased from Creativate


 HOW TO ASSEMBLE:

  1. There are a lot of pieces to this card and you do not have to do them in this order.     
  2. Adhere the pieces of DSP to the corresponding pieces of Mossy Meadow Card-stock (see sample)
  3. Fold your Razzleberry cardstock on the score lines and then open and lay flat. This is your card base.
  4. Adhere on the two opposite ends of the card base the largest pieces from step 1 (Making sure to pay attention to directionality of the design.)
  5. On two of the white pieces of cardstock, stamp a small design of your choice and adhere these to Mossy green cardstock.
  6. Flip the card base over and adhere the two pieces from step IV to the opposite ends of the base.  Again PAY ATTENTION to the direction of the designs on the other side.
  7. Adhere the corresponding pieces of matted DSP to the last three sections of the base on this same side.
  8. Use the corresponding die to die cut the third piece of white cardstock, then stamp the sentiment and the flower using the “masking” technique. (Optional: stamp this on the front of your envelope as well to coordinate with your card.)
  9. Die cut out the scalloped die on the larger piece of Mossy Meadow cardstock. Adhere the sentiment you just stamped.
  10. Using the punch, punch out the end of the white strip of cardstock the stamp your sentiment.
  11. With your remaining cardstock cut out some leaves to embellish.  Punch the short strip of razzleberry to match the white strip and then adhere the white strip to it.
  12. Center this piece and adhere to the central thin strip of the card base; making sure the card will fold shut.
  13. Now that the card is completed, re fold it on the score lines and brandish them folding the two end sections in toward the center closing the inside of the card.
  14. Take the strip of Razzleberry cardstock and fold on the score lines to from the belly band.  The ends will not meet. Place the sentiment centered over the spaced adhere it being careful not to put adhesive all the way across so that it will not stick the card itself.  Slide the belly band over  the card.

  15. WHAT YOU’LL NEED:

Wednesday, October 19, 2022

ELEPHANT THANK YO FOR YOUR KINDNESS

 This stamp set is so precious for baby cards but Lorri showed me it's cute for o many other reasons.I hope you like it too, and see it's versatility.

THANK YOU FOR YOUR KINDNESS 

Cased from Lorri Heiling


  1. Take the DSP and setting the three Deckled Rectangle Dies on top, from largest to smallest, run through the die cut machine.
  2. Adhere each of these on to the corresponding sized piece of Soft Suede cardstock.
  3. Stamp the sentiment in Early Espresso in on the bottom left corner of the largest one. 
  4. Take the ribbon and wrap around the smallest rectangle (to the left) and tie in a knot.
  5. Adhere all three rectangles to the card base from largest to smallest.
  6. Stamp the elephant on a piece of white cardstock then color in and die cut out.  Adhere to card with mini dimensional. (Stamp the elephant on the envelope and color in if you would like it to coordinate.)
  7. On a scrap piece of petal pink cardstock die cut a tiny bow and adhere to elephant’s tail and embellish with a pearl.  
WHAT YOU'LL NEED:

Wednesday, October 12, 2022

HALLOWEEN:IF YOU'VE GOT IT HAUNT IT

 IF YOU’VE GOT IT HAUNT IT!


HOW TO ASSEMBLE:

  1. Adhere piece of DSP to card front
  2. Stamp the hat on the smallest piece of cardstock and punch out.  
  3. On the next piece of white cardstock, 
    1. Stamp the spider in the top right hand corner
    2. The sentiment centered on the bottom;
    3. The witches boots just above the sentiment.
  4. Color in the hat and boots however you would like with the Stampin’ Blends.
  5. (Optional) Punch out a couple of stars in pumpkin pie cardstock and adhere to the hat.
  6. Adhere the had to the card using dimensionals. And, adhere the bow above the spiders web.
  7. Adhere the parakeet cardstock to card front at a slight angle then adhere the white stamped cardstockon top of this.
  8. Stamp sentiment on the largest piece of white cardstock and adhere to the inside of the card.
  9. (0ptional) Stamp image to the front of the envelope to coordinate with your card.

WHAT YOU’LL NEED:

Wednesday, October 5, 2022

RAYS OF LIGHT BIRTHDAY CARD

 RAYS OF LIGHT BIRTHDAY CARD

HOW TO ASSEMBLE:

  1. Using the daubers and either the ink pads or ink refills, ink the stamp on the stamparatus then stamp the piece of white cardstock. Working from the center with yellow outwards to the red. Lightly spritz. Re stamp if needed.
  2. Since you are inking the sunlight, ink some more and stamp the flap of your envelope to coordinate with your card.
  3. Stamp the sentiment in Real Red across the bottom of the card.
  4. Adhere this to the card front.
  5. On a scrap of white stamp the Woo Hoo! Then fussy cut it out.  Adhere to the card front with dimensionals.
  6. Stamp birthday sentiment on the inside of the card.
  7. Embellish card front with rhinestone jewels.

WHAT YOU’LL NEED:

You're the Best Part of My Day

  YOU’RE THE BEST PART OF MY DAY HOW TO CREATE & ASSEMBLE: Fold and burnish card base. Set aside. Run (3 1/4” x 5 1/4”) piece of Crumb C...