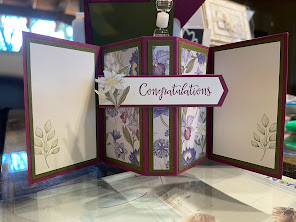
FUN FOLD CONGRATULATIONS
Cased from Creativate
HOW TO ASSEMBLE:
- There are a lot of pieces to this card and you do not have to do them in this order.
- Adhere the pieces of DSP to the corresponding pieces of Mossy Meadow Card-stock (see sample)
- Fold your Razzleberry cardstock on the score lines and then open and lay flat. This is your card base.
- Adhere on the two opposite ends of the card base the largest pieces from step 1 (Making sure to pay attention to directionality of the design.)
- On two of the white pieces of cardstock, stamp a small design of your choice and adhere these to Mossy green cardstock.
- Flip the card base over and adhere the two pieces from step IV to the opposite ends of the base. Again PAY ATTENTION to the direction of the designs on the other side.
- Adhere the corresponding pieces of matted DSP to the last three sections of the base on this same side.
- Use the corresponding die to die cut the third piece of white cardstock, then stamp the sentiment and the flower using the “masking” technique. (Optional: stamp this on the front of your envelope as well to coordinate with your card.)
- Die cut out the scalloped die on the larger piece of Mossy Meadow cardstock. Adhere the sentiment you just stamped.
- Using the punch, punch out the end of the white strip of cardstock the stamp your sentiment.
- With your remaining cardstock cut out some leaves to embellish. Punch the short strip of razzleberry to match the white strip and then adhere the white strip to it.
- Center this piece and adhere to the central thin strip of the card base; making sure the card will fold shut.
- Now that the card is completed, re fold it on the score lines and brandish them folding the two end sections in toward the center closing the inside of the card.
- Take the strip of Razzleberry cardstock and fold on the score lines to from the belly band. The ends will not meet. Place the sentiment centered over the spaced adhere it being careful not to put adhesive all the way across so that it will not stick the card itself. Slide the belly band over the card.
WHAT YOU’LL NEED:


.jpeg)
No comments:
Post a Comment