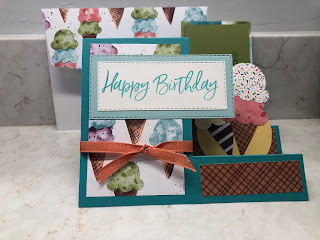
FUN FOLD BIRTHDAY CARD
CASEd from Becky Costello
The Sweet Ice Cream Bundle will no longer be sold as a bundle come July so you may want to snag it up before the end of June to get the 10% off pricing. AND. . . in June this Designer Series Paper will be going bye-bye.
HOW TO:
1. Your card base has already been cut and scored for you. Lay flat in front of you with the side that only has on score line on your left.
2. Adhere Ice Cream Cone DSP on lower left of card front.
3. Adhere the brown checked DSP smaller piece to bottom right centering it. and second slightly larger piece on the third space up from bottom on the right. Adhere the yellow circle on this piece making sure to ONLY glue to that section.
4. Adhere the DSP with greens on it to the fifth (5th) space, doing your best to align it when the card is closed, that it is same height as the card fold. Set this to the side.
5. ON the white piece of card stock, stamp the sentiment in Bermuda Bay ink. Then use smaller stitched rectangle die to cut it out. Die cut the piece of Pool Party cardstock with the slightly larger stitched rectangle die. Adhere the sentiment to this.
6. Using the punch and the pieces of DSP, create to ice cream cones with two scoops each. Adhere the cones on the yellow circle making sure to make them fit within the dimensions of the card.
7. On the piece of Old Olive stamp the other sentiment making sure it is covered by the cones when the card is closed. Adhere this to the piece of greens cardstock with dimensionals.
8. On the inside of your card, (flip it over the single score line will now be on your right) you will create a tiny pocket for a gift card. This the small piece of Bermuda Bay cardstock that has 3 score lines. Fold them in and adhere them to the lower right part of the card. This will serve as a gift card holder.
9. Adhere the white piece of cardstock to the top right half of the inside just above the score line.
10. Flip the card back over. Now fold your card accordion style making sure to brandish with your bone folder.
11. Take your ribbon and bring it around the front left of your card tying in a know (or bow if you can).
12. Grab that Birthday sentiment you made in step 5 and adhere it to the top left front of your card.
13. Optional: to coordinate your envelope with your card, adhere DSP to the flap of the envelope and either fussy cut it to trim to size or use the envelope die to give it a fun touch.
14. PHEW! That’s done, you did it!
SUPPLY LIST:


.jpeg)
No comments:
Post a Comment